In this tutorial, using particles as the rig to control an objects' motion, you will be creating a paper poster getting blown by the wind.
-
Open the included file Box2-SinglePaperTutorial-Start.max.
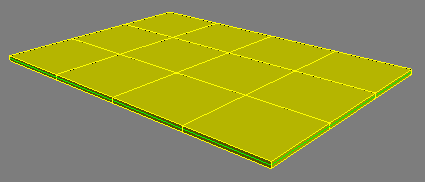
The scene contains two objects: the poster mesh and the poster rig mesh. You'll animate the rig mesh with Particle Flow, and then transfer the rig motion to the poster mesh with the Particle Skinner modifier.
-
Open the Time Configuration dialog and turn off Playback > Real Time.
Real Time should always be off when working with the PhysX simulation engine.
-
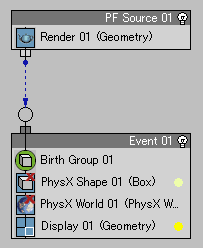
Open Particle View and create the following setup:
-
Add an Empty Flow. Click the PF Source event and set Quantity Multiplier > Viewport % to 100.
-
Add a Birth Group operator as a separate event, and then connect the two events. Click the Birth Group operator and make these settings:
-
Add the Single-Poster-Rig object to the Particle Objects list.
-
In the Separate Particles For group, turn on Object Elements.
-
Click the Update Particles From Objects button and check the Stats group below to verify that the data was updated. (For example, Particles Total changes from 1 to 12 because Single-Poster-Rig contains12 elements.)
-
Click the Hide button to hide the Single-Poster-Rig object.
-
Set the Display operator to Type=Geometry.
-
Add a PhysX Shape operator and set Mass > By Density to 0.1 for a lighter feel for the paper.
-
Add a PhysX World operator after PhysX Shape and click Create New Driver to add a PhysX World helper to the scene. Click the => button to select the helper, and then, on the Modify panel, turn on Apply Gravity and Ground Collision Plane.
-
Play the animation.
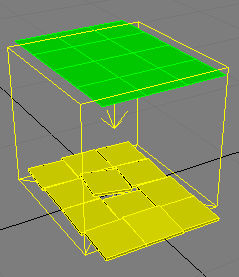
The rig particles drop to the ground and break up slightly. You can resolve this with the PhysX Glue test, but first you'll adjust a couple of world settings.
-
Set Acceleration (under Apply Gravity) to 120, and set Dynamic Friction to 1.5 to prevent the paper from sliding around too much.
-
Back in Particle Flow, add a PhysX Glue test after the PhysX World operator. Click the PhysX Glue test in the event to display its parameters.
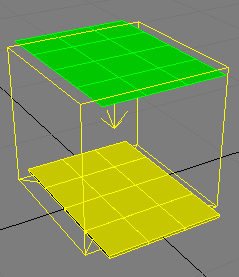
To see the bindings created by PhysX Glue, turn on Visualize Binding on its Parameters rollout.
-
In the Glue test parameters, set Binding > Type to Distance, to make the bindings behave more like cloth or paper, and set Max Binds p/Particle to 8, to help preserve the original formation of particles (elements).
-
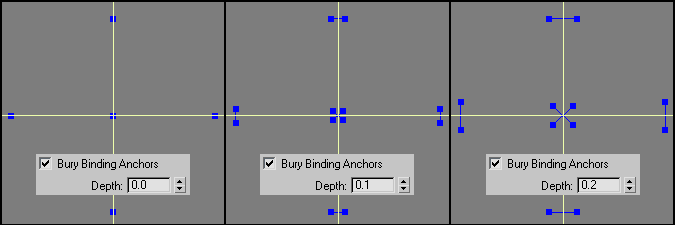
Also, scroll down to the Distance Binding rollout, turn on Bury Binding Anchors, and set the Depth value to 0.1.
-
The PhysX World helper should still be selected; if not, select it. Open the Advanced Parameters rollout and set Subframe Factor to 18.
Whenever you increase the Max Binds value, it's important to change Subframe factor to a corresponding value. This helps maintain the stability of the simulation.
Now that the particles setup is done, you'll apply the particle motion to the Single-Poster-Mesh object with the Particle Skinner modifier.
-
Select the Single-Poster-Mesh object, apply a Subdivide modifier, and set Size to 1.5.
The additional vertices give the particles more geometry on which to exert the influence of their motion.
-
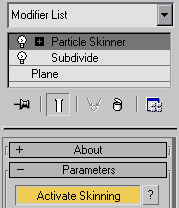
Add a Particle Skinner modifier to the Single-Poster-Mesh object, and add PF Source 01 to the Particle Flow Systems list.
-
Turn on Activate Skinning.
-
In Particle View, click the PhysX Glue test and turn off Visualize Binding.
-
Turn off the Display operator so the particles no longer appear in the viewports.
-
Play the animation.
The mesh is now skinned nicely, following the particle motion as expected. Now you'll add some wind to blow the paper away.
-
On the Create menu, choose SpaceWarps > Forces > Wind and add a Wind space warp in the Perspective viewport.
You'll use a relatively weak wind strength, relying on the turbulence instead to create natural movement.
-
Set the space warp position to (-20, 0, 0) and the rotation to (0, 60, 0).
-
On the Modify panel, set Force > Strength to 0.1, Wind > Turbulence to 0.1, Wind > Frequency to 0.05, and Wind > Scale to 0.1.
-
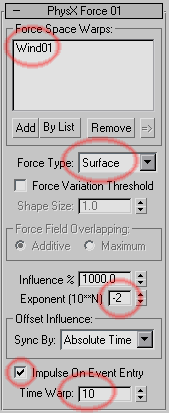
Back in Particle View, add a PhysX Force operator before the PhysX World operator, and add the Wind space warp to the new operator.
-
Set Force Type to Surface so the wind pushes the paper more naturally. With this setting, particle surfaces that face the wind are affected more so than others.
-
Set Exponent to -2 to decrease the overall effect of the wind.
-
Turn on Impulse On Event Entry and set Time Warp to 10.
This causes the wind to affect the particles only for 10 frames, giving the effect of a sudden push, then letting the particles settle down on the ground for the remainder of the animation.
-
Play the animation.
The paper is blown by a gust of wind, and then settles to the ground.
You can find the completed animation in the included file Box2-SinglePaperTutorial-Finish.max.