In this section you'll create a simple brick wall and use virtual glue to mortar the bricks.
-
Reset 3ds Max and start again with a new PhysX Flow. Set the animation length to 300 frames.
-
From the depot, drag a Birth Group operator on top of the Birth Grid operator.
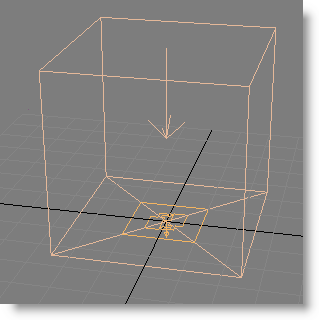
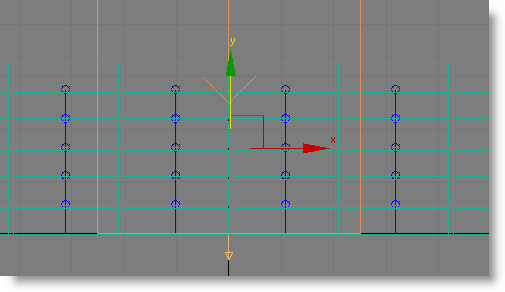
Birth Group replaces Birth Grid and the particles disappear from the viewports. However, the large wireframe cube remains. This is the PhysX World helper.
The down arrow pointing to its center indicates the direction of gravity, and the X on the bottom side indicates the location of the ground collision plane.
By default, this coincides with the home grid in 3ds Max (the XY plane at Z=0).
There is no physical sign of Birth Group in the scene; it creates particles from mesh objects that you specify, as you'll see shortly.
-
Delete the Spin operator from Event 01.
The operator isn't necessary for this tutorial.
-
Delete the Shape operator from Event 01.
The particle shapes will be defined by Birth Group operator.
-
Go to the Create panel and add a Box primitive of Length=20, Width=10, and Height=5.
-
Activate the Move tool and then right-click the spinners of the X, Y, and Z fields at the bottom of the Max interface so the box is centered on the home grid.
-
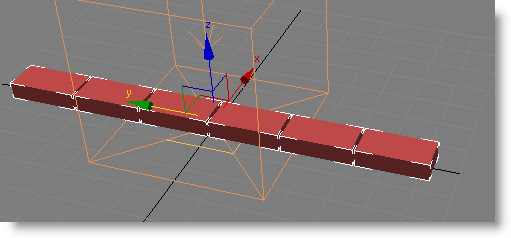
Clone the box by Shift+dragging it along the Y axis, and release the mouse button when the clone is right next to the original. Use the Clone Options dialog to create five copies, making six bricks in all. Select all six bricks and then position them so the row is lined up along the world Y axis and centered on the X axis.
-
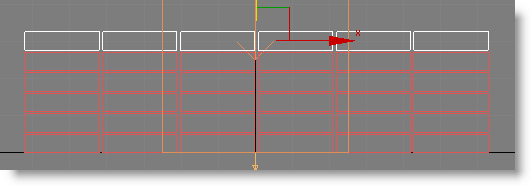
In the Left viewport, Shift+move the bricks straight up on the Y axis so the clones are just above the original row, and again make five copies.
-
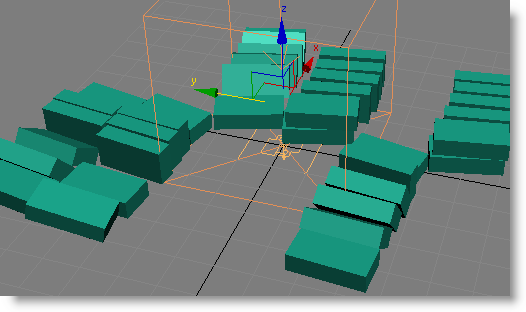
Click the Birth Group operator and, under the Particle Objects list, which is empty currently, click the By List button next to Add. The Select Objects dialog opens with the text cursor in the Find field. Type "b" to highlight all the Box objects and then click Select.
The Box object names now populate the list, and their particle counterparts appear in the viewports. The boxes are the particle objects; once you've applied them to the operator, you can get them out of the way easily.
-
Click the Hide button under the list. This hides the objects in the list, leaving only their particle counterparts.
The particle bricks use the Display color; change it if you like.
-
Play the animation.
Chances are the bricks succumb quickly to the pull of gravity and fall down in stacks.
You can fix this easily with the PhysX Glue test.
-
Add a PhysX Glue test to the end of Event 01. Click the test so its parameters appear in Particle View. Set Type to Rigid.
The Glue test creates bindings between pairs of particles, so it's important to be able to see what it's doing. Thus a crucial option is Visualize Binding.
-
On the Parameters rollout, turn on Visualize Binding.
You can't see the bindings because there aren't any yet.
-
Make sure you can see the bricks clearly in the Left viewport, and then use the Bind Distance spinner to increase the value until you see blue lines between the particles in the Left viewport.
The bindings are mainly vertical because that's the shortest distance between particles.
-
As soon as you start to see the bindings, play the animation.
You'll probably see that the columns of bricks move together. We have virtual mortar above and below the bricks, but not on the sides.

First you need to deal with the columns moving when they shouldn't. This is due to a lack of stability in the simulation, which you can resolve by increasing the Subframe Factor value.
-
Click the PhysX World operator, and then on its parameters rollout, click the => button to open the PhysX World helper's parameters on the Modify panel. At the bottom of the panel, expand the Advanced Parameters rollout and set the Subframe Factor value to 10.
The general rule of thumb for setting the Subframe Factor value is to double the Max Binds p/Particle value and add 2. So, if Max Binds p/Particle is 4, then Subframe Factor should be set to (2 x 4) + 2=10. Sometimes you can get away with a lower Subframe Factor value, depending on the general complexity of your simulation. But for now, use 10.
If you set this value while the columns are disarrayed, you'll see them jump back to their original positions.
Important: Increasing the Subframe Factor value improves the accuracy of the simulation by applying the settings more times per frame; this can slow down the simulation, but in many cases is transparent. When working with your own simulations, if you see any instability, try increasing the Subframe Factor value; chances are this will improve stability.
-
Play the animation again and make sure things are more stable; if not, increase the Subframe Factor value further.
Next, to allow the columns to bind together, you'll increase the possible number of bindings.
-
Set Max Binds p/Particle to 8, and then increase Bind Distance until you start to see diagonal lines.
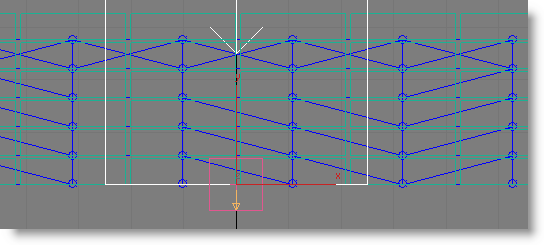
You probably won't see bindings between every pair of horizontally adjacent bricks, but as long as you have at least one or two horizontal bindings for each column, the whole wall should hold together.
-
Play the animation.
Ideally, nothing should happen. If the wall moves, increase the Subframe Factor value until it doesn't.